Back to Plugins
Custom Unit Menu Window
Version 2.4•Updated September 8, 2021
Description
This plugin allows to change the default bottom window of the unit menu screen, so you can show data from the unit that is not available by default. You can also add more windows, with each window showing different types of data for the selected unit. The data that will be displayed will be choosen by the user from the list of data that was added to the plugin.
You don't need to use custom parameters and you don't need to know about progamming. To modify the window, you only need to change some options specified in the instructions below. It is possible to make windows show different types of data like races, states, class type, among other things.
Screenshots
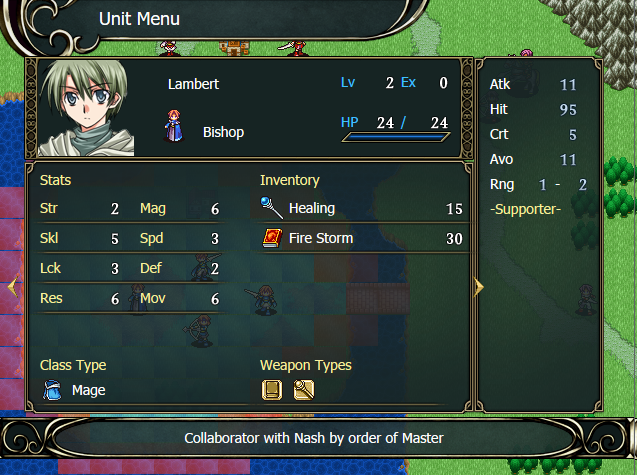
Unit Menu Window - Example #1
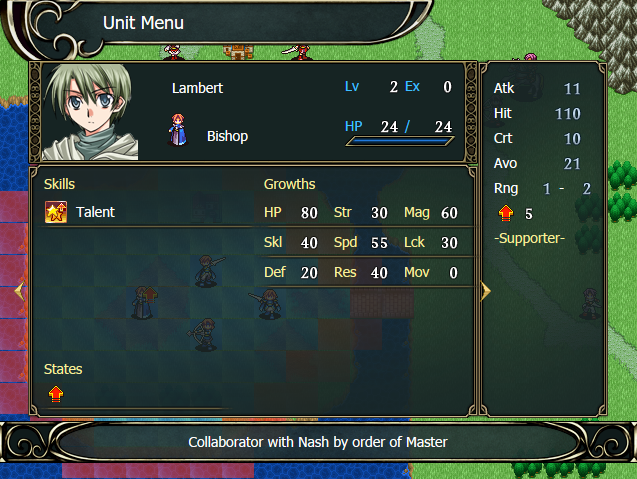
Unit Menu Window - Example #2
Installation
Custom Windows
The windows are divided into four sectors: top left, top right, bottom left and bottom right. Each of these sector can hold one type of data. In particular, the top sectors are bigger than the bottom ones, so they can have more detailed information. For example, if you insert the races in a top sector, you can see the name and icon of the race, but if you add it to a bottom sector, you can only see the icon.
In addition to that, most data can be selected, which allows to show the description of the data below the window. In the example mentioned earlier, it would show the description of the selected race.
Note that not all data is available in all sectors. Some are exclusive to top sections and some others to bottom sections.
How to assign data to each sector
To assign data to a sector, you need to open the _config.js file with a text editor like Notepad. In there, you will find a list of variables with default values already set. The variables TOP_OPTIONS and BOTTOM_OPTIONShave the data available to use, while the Options variable is where you can assign one of those data options.
Notice that each variable is not just a value, but an list of values. Each value represents the data from that section of each window. For example, if the TOPLEFT value has [TopRaceInteraction, GrowthInteraction] it means that the first window will have a list of races at the top left, and the second window will have a list of the growths of that unit.
Before modifying those values, make sure to define the value you want for WINDOWS_COUNT, which determines the amount of windows the screen will have. Also, make sure that each list has the same amount of elements as the amount of windows defined in WINDOWS_COUNT.
Here is a list of all the possible values that can be used for the top and bottom sections:
-
TOP_OPTIONS: this is an list containing with all the options available for top sectors:
- NullInteraction: Empty space. Used when you don't want to fill this sector with data.
- InventoryInteraction: List of weapons and items that the unit has in its inventory.
- StatsInteraction: Current stats of the unit. It doesn't include the HP stat.
- AltStatsInteraction: Alternative version of StatsInteraction. The difference is that it has 3 columns instead of 2. Useful if you have too many stats and they don't fit in the window.
- TopWeaponTypeInteraction: List of weapon types available to the unit. Shows icon and name.
- TopSkillInteraction: List of skills of the unit. Shows icon and name.
- TopRaceInteraction: Races list. Shows name and icon.
- TopStateInteraction: States list. While by default the game shows the current states of an unit, this will let you see its name and description.
- GrowthInteraction: Unit's growth values.
- PlayerGrowthInteraction: An alternative version of GrowthInteraction. It is the same, but this one is only displayed for units of the player's army.
- SupportInteraction: Supports list.
- TopTraitsInteraction: List of traits. This only works if you also have the plugin "Traits System" installed.
- CustomCombatArtsInteraction: List of combat arts. This only works if you also have the plugin "Combat Arts" installed.
- CustomSpellsInteraction: List of weapons and items from Orignal Data entries. This only works with the plugin "Weapons and Items as Original Data" installed.
-
BOTTOM_OPTIONS: this is an list containing with all the options available for bottom sectors:
- NullInteraction: Empty space. Used when you don't want to fill this sector with data.
- BottomWeaponTypeInteraction: List of weapon types available to the unit. Shows icon.
- BottomSkillInteraction: List of skills of the unit. Shows icon.
- BottomRaceInteraction: Races list. Shows icon.
- BottomStateInteraction: States list. While by default the game shows the current states of an unit, this will let you see its description.
- ClassTypeInteraction: Class type of the unit's current class. Shows name and icon.
- BottomTraitsInteraction: List of traits. This only works if you also have the plugin "Traits System" installed.
-
Options: this variable has 4 fields, where each field correspond to one of the window's sectors.
Each field has its name explaning the sector that will be assigned, for example the field TOPLEFT is assigned to the top left sector.
There are two way to assign a value to the field:
- You can do something like TOP_OPTIONS[2], in this case you are using the third value found in the list of TOP_OPTIONS. Note that the index starts with zero, so the first element is TOP_OPTIONS[0], the second TOP_OPTIONS[1], and so on.
- The other option is to directly specify the name of the data, like for example writing BottomRaceInteraction or BottomStateInteraction.
- There are also two other fields: WINDOWS_COUNT and SECTION_DISTANCE. The first one was already explained before, and the other sets the distance between the top and bottom sections. By default the value is 0, but it can be changed if your menu window has a differnt size than the default value. Use a positive number to increase the distance and a negative number to decrease the distance between the top and bottom sections.
Sections Stats and Growths
If you use the StatsInteraction, AltStatsInteraction and/or GrowthInteraction, you will notice that you can't select each stat to check their description. That is the default behaviour, but it can be changed. To enable this, set true to the variable ENABLE_STAT_DESCRIPTION in the _config.js file
To do this, you need to create and Original Data entry for each stat. Each entry must have exactly the same name as the stat, and you can write the description in the Description field. All entries must be in the same tab, which will be specified by the STAT_TAB variable. Note that the value zero means the first tab, one is for the second tab, and so on.Version History
2.4
- Added compatibility to the version 3.0 of the Combat Arts plugin. Note that this update make this plugin incompatible with any version of the Combat Art plugin that is older than 3.0.
2.3
- Fixed a bug that would crash the game when using a item of the Resurrection type.
2.2
- Added a option to select and check the data from the stats and growth sections.
2.1
- Fixed graphical bugs related to the inventory and weapon type sections.
- Fixed bug that would crash the game when inspecting an enemy unit's inventory.
- Added an alternative version of the stats section, that divides the stats into 3 columns instead of 2.
- Added an option to set the distance between the top and bottom sections.
2.0
- The plugin now allows for the addition of several windows, instead of just one. The default unit window will be the first custom window and the other windows will be added according to the settings selected by the user.
- Added option to set the inventory, unit stats and list of skills as data for the top section.
- Added option to set list of available weapon types and list of skills as data for the bottom section.
1.2
- Added option to see weapons and items from Original Data entries. Requires the Weapons and Items as Original Data plugin
1.1
- Added option to see traits in the window. Requires the Traits System plugin.
- Added option to see combat arts in the window. Requires the Combat Arts plugin.
1.0
- Initial version.